
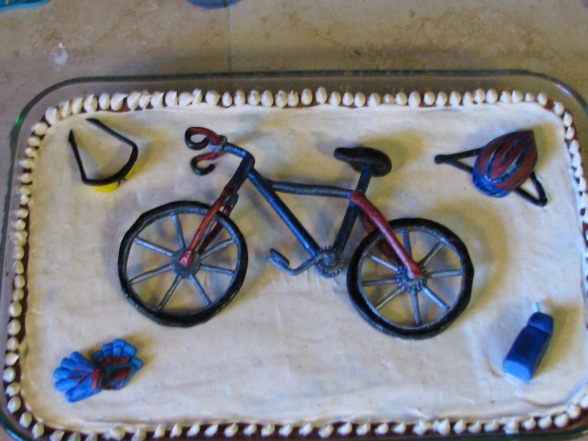
I’ve never written a blog before, or created a tutorial, and I’m very new to the cake world. So, in my usual form I jumped in head first for all of it and decided that my second gumpaste/fondant creation would be a 3D bike that would stand up. Hmmm, how hard can that be? LOL yaaa, so I’m sharing how hard/easy it is….
This is a Step by step tutorial of what I did and leaving out what went wrong (takes too much time 🙂 ) and what you should probably do . I couldn’t find a “how to” for a bicycle, so it took me 6 weeks of playing to get things to work and in the end still ran out of time to fully complete it. A lot of “drying time”, eats up the time. With that here we go….
Supplies:
- Black and white picture on paper, polarized if outline doesn’t show up well; cardboard, plastic wrap, tape
- Parchment paper, tin foil, paper towel, tooth
- Tooth pics, skinny wooden dowel or skewer
- X-Acto knife, ruler or bench scraper with ruler on it, small circular cutting implement (cookie cutter or round icing decorating tip)
- Rolling pin, small paint brush, bowel of water
- Gumpaste/Fondant mix about 50/50 or gumpaste with enough fondant to make it workable, smooth, and able to dry well
- Food color (I currently have Wilton gel), silver powder
- Patience, Patience, Patience 🙂
Tried to take pics as I went along and will place as many as I can in here.
- Easiest to tint Gum/Fon to the base color of each part. Won’t need a lot of mix for this bike
 . Mine is all blue so it would show up easier in pics.
 - Place image on cardboard, cover with plastic wrap, tape underneath making sure plastic is smooth.
- Starting with the frame: roll out Gum/Fon into long “worms” (mine were 3 parts), decide thickness, I made the middle brace slightly thinner that the other 2, place on image and cut to length. Cut adjoining ends at an angle to create a clean fit.


4. Dry fit the frame then glue, let dry. Once dry go back over the joints with glue to smooth joints and add extra stability. A bit like soldering 🙂
5. At this point I made the seat, take a small ball of Gum/Fon and press out to a tear drop shape. Indent along side of point, can add an indent down the top of seat. Let dry
6. Next the rim: roll out Gum/Fon to approx 1/4 in thick. Using ruler as gauge of thickness and width. I don’t have a measurement for the width, I gauged it by the thickness of my frame. The cut even strips. Lay strip on its side over your pic and bring together in a circle, cut of excess. With paint brush use water to glue and smooth seem. Can always come back with “glue” and smooth more. Let mostly dry then flip so bottom edge will dry.
7. For the tire: Roll out Gum/Fon to approx less 1/2 in ( I didn’t measure mine, eye balled it again,  but I think that is close) just make it thicker than rim. Roll out “tread” marks then continue as with rim. Using water adhere to rim and seal seem, don’t smooth top of seem, just side. Using fingers, round off tire edges. Let dry. Sorry, didn’t have a pic for this step.
8. The spokes: Roll out rather thin “worms”. 4 for each wheel. Lay each across wheel making sure they span the width. Leave 1 length whole, cut remaining 3 in half.  Lay whole length inside wheel, cutting as necessary to fit. Fit other pieces evenly space inside wheel, middle ends coming to a point. Let dry. In this pic only the left set had been placed inside rim.
9. Once dried, using brush and different food colors, mark ends of spokes with inside rim for realigning later.
10. Next will create 7 disks: These will be 3 smooth disks for cover middle of spokes, 1 smaller smooth disk for behind one pedal arm. 1 lrg/1 sm gear disk for one side of spoke middle and 1 small gear disk for behind the other pedal arm. You can see the smooth disks and colors in the right pic.
Roll out Gum/Fon thin, I used the wide end of Wilton #12  for larger disks and a small cookie cutter for little smaller sized disks. After cutting disks, leave middle of smooth disks thicker and thin out to edge. I used my finder to feel thick/thin. For gears. Leave thickness same. Using X-Acto knife cut “notches” around disk. Mine were a little like a “V”. Took a couple attempts to not cut off a “gear tooth”.
11. Next roll out pedal arms. Approx 1 1/2 in long (can always shorten it), shape into a “Z”, making one end a bit longer (for pedal) and other end a bit shorter (to attach to disk). Let dry. 
Next make foot pedal. Take a little ball, slightly flatten and shape to a rec tangle. Using tooth pic, create 8 evenly spaced indents. Let dry.
12. Assemble wheel: to one set of spokes, glue a larger smooth disk to each side . To other set of spokes, glue 1 larger smooth disk and the gear assembly to each side. Glue pedal arms to remaining smooth disk and gear disk, dry and then glue foot pedal on.
Once spokes are dry, put glue on end of each spoke and place spokes into wheels, aligning colors. Disks should give enough lift, to center spokes in middle of rim. If not, a little tin foil can be placed underneath. Let dry, then add glue to smooth and strengthen joints. Let dry.
13. Now for the bars that attach to wheels. I waited to make these so that I could lay out my pieces on my pic and get the right length and bend in the bars. Roll out length needed. Flatten ends and create bend for space over wheel. Place over a cylinder object to hold shape and let dry.
14. The next steps were difficult for me, so if you come up with a way that worked well please share them :)!
Glue one end of bar to center of wheel disk/gear. Place tin  foil under other end of bar while drying. Flip over and repeat process. Pic is of how I actually did it, I didn’t like it.
15. Next glue bars onto frame. Need to create something to hold frame up while glue sets. This pic is what I did, but not very stable.
16. Once dry, leaving bike in “brace” glue seat on, make handle bars.
My handle bars were “street” not “off road”, because I had a difficulty with them. I used the sleeve
  to my meat thermometer to curve bar around. Once dry, paint before attaching to bike frame, dry again, then using a little bit of glue on end of bike post, place handle bars against it and using a little bit of Gumpaste wrap around bars securing to bike post. Hold for a minute gumpaste will harden quick enough to let go.
17. Last steps are placing pedal arms and kick stand. I did these before other parts were attached, they broke off several times and in the end only one pedal was attached and not facing correctly. 🙂 So, I think! with bike in brace and one pedal arm at a time. Placing tin foil under pedal to keep from falling. Let each dry well. Last add kick stand, tin foil underneath again. Once dry test to see if it will hold. Now kick stand could be made using the dowel or skewer I listed in supplies and covered in fondant.
18. Painting can be done one of two ways, paint each piece as you go without painting glue points, or paint once finally assembled. Note that once assembled bars on wheels are hard to paint underside.


Thanks for looking! Hope you give it a try, let me know how yours turns out. Happy Decorating!

Thanks for the tutorial, very interesting. I have a motorbike and a bicycle wedding cake to do first time for all three
keep up the good work
caz
I am a terrible blogger, I just now found your comment. Thanks for taking a look. Hope your bikes came out well and the tutorial was a good jump off point for your own assembly ideas.